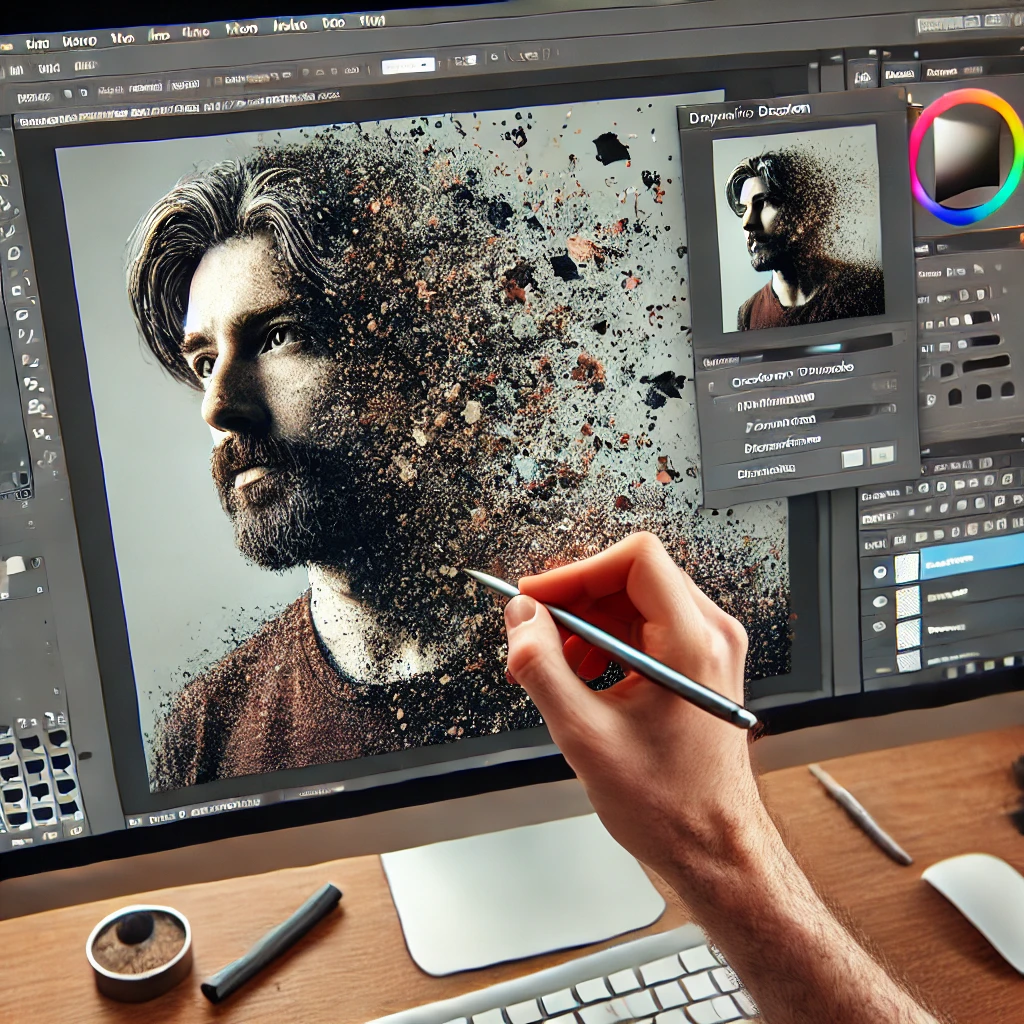
The dispersion effect is a dynamic and visually striking photo manipulation technique that makes parts of an image appear as if they are breaking apart and dispersing into the air. This effect is popular in digital art and promotional graphics. In this guide, you’ll learn how to create a stunning dispersion effect in Adobe Photoshop.
1. Choose a High-Resolution Image
Start with a high-quality image with clear subject details.
Tip: Action shots, portraits, and sports images work well for the dispersion effect.
2. Select and Isolate the Subject
Remove the background to focus on the subject.
Steps:
- Use Select Subject or the Pen Tool (P) to cut out the subject.
- Apply a Layer Mask to remove the background.
3. Duplicate the Subject Layer
Create a copy for the dispersion effect.
How to Apply:
- Duplicate the isolated subject layer (Ctrl+J).
- Rename the copy to Dispersion.
4. Apply the Liquify Filter for Stretching
Stretch the duplicate layer to prepare for dispersion.
Steps:
- Go to Filter > Liquify.
- Use the Forward Warp Tool (W) to pull out parts of the subject in the direction of the dispersion.
- Apply the changes.
5. Add a Layer Mask to the Dispersion Layer
Use a mask to control where the dispersion effect appears.
Steps:
- Add a Layer Mask to the Dispersion layer.
- Select a soft Brush Tool (B).
6. Use Custom Dispersion Brushes
Dispersion brushes create the fragmented effect.
How to Apply:
- Download or create custom dispersion brushes.
- Use a soft, scattered brush to paint black on the mask, erasing parts of the stretched image.
- Switch to white to bring parts back if needed.
7. Refine the Dispersion Effect
Add variation to the dispersion for realism.
Tips:
- Use multiple brushes for different textures.
- Adjust brush size and opacity for depth.
8. Blend with the Original Layer
Blend the dispersion with the original subject for a seamless transition.
Steps:
- Mask parts of the original subject layer.
- Gradually erase edges to blend with the dispersion layer.
9. Add Shadows and Highlights
Enhance the realism with lighting adjustments.
How to Apply:
- Use Dodge and Burn Tools or Curves Adjustment Layers.
- Add shadows around the dispersed areas.
10. Final Touches and Export
Polish the final look and export.
Tools:
- Brightness/Contrast for balance.
- Color Lookup for mood.
- Export as JPEG or PNG.
Conclusion
The dispersion effect in Photoshop creates a powerful sense of motion and drama. With practice and creativity, you can master this technique to produce captivating and energetic visuals.